THE HAPPY PLANNER™ | PLANNING A WEEK’S MEALS

Planning our meals

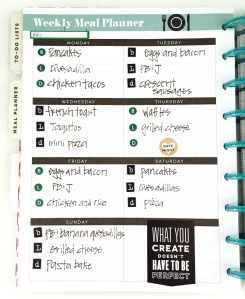
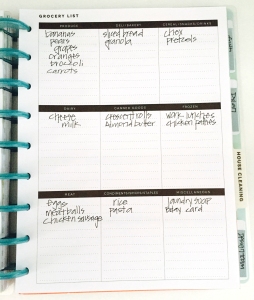
Today we’re popping in with these meal planning pages from my The Happy Planner™.  With the busy holiday week ahead, I thought it was a great example of how to use your planner to make food shopping and planning dinner a bit easier & more fun!

planning a week's meals in The Happy Planner™ of mambi Design Team member Casie Gutierrez | me & my BIG ideas

“I like to have a plan for most things and meal planning makes the 4pm ‘what’s for dinner’ situation less stressful. I know what I have planned, I know I have all the ingredients stocked, and I feel more prepared. 

I start meal planning by making breakfast, lunch, and dinner headers using ‘B’ ‘L’ ‘D’ alphabet stickers. I fill in meals based on what we have going on that day by flipping back to my weekly planner pages and checking it out. Then I fill in my grocery list for the week and feel ready! I find the categories on the grocery list most help because they allow me ro attack grocery shopping more efficiently.”
THE HAPPY PLANNER™ | DIY HALLOWEEN PAGE-MARKERS

Halloween paperclips

We love how mambi Design Team member Casie Gutierrez is keeping herself in the Halloween spirit this week by creating these Halloween-themed page-markers to use in her Happy Planner™. All it took was the pack of ‘Spooky’ SOFT SPOKEN™ stickers, a couple of paper clips, and washi tape! Read on!
DIY Halloween paper clips created by mambi Deisgn Team member Casie Gutierrez to include in her Happy Planner™ | me & my BIG ideas
About this Happy Planner™ craft, Casie writes: “I love having cute little embellishments peaking out of the top of my planner. Paper clips are an easy way to add your own little flair to your planner. To make your own, first gather your supplies: standard paper clips, washi tape, paper scraps, mambi’s new SOFT SPOKEN™ ‘Spooky’ stickers, and The Happy Planner™ Note & Graph Paper. Use a thin strip of washi tape and run it through the top of the paper clip, with the sticky sides facing up. This creates a little washi flag to attach the SOFT SPOKEN™ die cuts to. Attach the sticker to the washi flag and secure with another piece of tape on top. Use trimmed-to-size scrap paper as backing.”

click images below to enlarge

Casie continues: “After I made my embellishment paper clips, I used the leftover stickers to decorate a blank note page in my Happy Planner™. I plan to add a photo of my boys in their Halloween costumes to the front of the page. On the back of the note page, I have a place for journalling about Halloween all decorated and ready to go!”